Monday 8 October 2018

Dragon Time

Good morning one and all.

Having all this time to create is brilliant and even better I am remembering to blog about my antics as well.

Late last night the stash came out and I felt the need to create another clay dragon, well I actually made four dragons in total, so this will keep me out of trouble for a while.

I used translucent Cernit clay to make this little dragon, used a large polystyrene egg form to make his home and added texture with Powertex medium. One of my favorite pieces of material to use for my Dragon eggs is Paperdecoration which you can get at POWERTEX.CO.UK 

I have yet to paint the casing of the egg but for once I was happy to let it dry overnight as ordinarily I am very eager to carry on with my art and dislike having to wait for things to dry.

So here he is before I get the pigment colours and varnish out.


So my next post will be of him completed, please do pop back to see how he turned out and to see what colours I have decided on.

LIVE
LAUGH
LOVE

~Jinny ~

Sunday 7 October 2018

Halloween time

I do love Halloween and the option to create some spooky stuff.
On a recent trip into Dumfries, I popped into Poundland and found a small polystyrene pumpkin and decided I wanted one to transform.

Here is my process on how it ended up.


I chose some material I quite liked from my stash and wanted to use some Translucent Powertex. This product is fab for not just doing what it say's on the bottle but it is a good strong glue too! 

 First I cut out the stalk, then I cut strips of material and with the Powertex covered my pumpkin


I then cut out some lace flowers and added around the Pumpkin and glued back in the stalk, it was at this point I decided I was not quite sure about the material I had added and decided to add some tissue napkins instead, over the material.
This is the beauty of Powertex, you don't like what you have done, paint over it a different colour or if you have an older piece, change it to something else.

I got out my bronze Powertex  and made the stalk part by wrapping around the original stalk and making it bigger.
When it was dry, I used some faux pearl beads and bling to add around the base of the stalk, so for now my Pumpkin is done


I may do some more Halloween inspired crafts but then again, it may be Christmas crafts, you will have to keep watching and see what I am inspired to do next.
Until next time...

Live
Laugh
Love

~Jinny~

Clay Christmas decorations

Well, look at this twice in one week! This is what being off work does :)
We had our Grandsons over for a sleepover and as always they were little angels for Nanny and Grandan!! 
They are now home with their Mum and I decided it was time to get out some craft stash and create something. I ended up getting out my Polymer clay stash and have made my Grandsons a gingerbread Christmas tree decoration each. I have been making these for family and friends for the past few years but sadly did not make any last year. That may have been because I was busy making Christmas wreaths like a mad woman.
So I need to make amends and create some for this coming Christmas.

They are very easy to make and I find the process therapeutic, saying this not just the clay creating anything!  
  

And some more ...


Till next time

Love
Live
Laugh

~Jinny~

Monday 1 October 2018

October ...Already!!

Hello all, well I can't believe it is the first day of October!! Time sure does fly, soon it will be Christmas,there I said it lol 

As it is the first day of October and October means Halloween, I thought I would share a few Halloween projects I have done over the years. I have to admit, I kinda like being able to make spooky creations.


All of the above I made for a friends wedding out of mainly Polymer clay, I really enjoyed making all of these creations for their wedding day.

This art doll was made of mixed media and ended up being given as a Christmas pressie.


The ones above are made with my favorite medium Powertex, such a versatile medium to work with. 
 The Halloween wreath is an assemblage of different things and was made at work 
The pumpkin is another Powertex creation, made by blowing up a balloon and working the Powertex over the balloon, I was too eager to pop the balloon and it was not completely dry, hence the dent in my pumpkin but I think it adds to it's charm,the stump is made from Polymer clay.

I hope you enjoyed my blog for now.
Happy October

Till next time 
~Jinny~ 

Scottish life


Tuesday 18 September 2018

All moved

Hello, hello

Well, we moved and it all went fairly smoothly and even though we downsized everything fits in nicely. My main concern was all my art material and I now have a new shed to store all my stash, ok it is not the same as my last shed but it is stored away and I have easy access to it when I need anything. 
I have managed to do some creating this past couple of days on my days off and it has been so good, to be back creating and making. 


Both pieces made using Powertex 


I plan to do some more creating very soon, so watch this space

Monday 27 August 2018

Three days and counting

Well, three more days and counting.
For the past week I have been living like a squatter in my own home lol. No fridge freezer, no bed, no. My two youngest have flown the nest and my hubby is working straight through on long shifts.
All of my art stuff is already in our new home in Scotland and I am itching to be creative but will have to wait a few more days yet!
Thursday is the day when our new journey starts and we begin a new chapter in our lives. Thankfully we have a week off a non-working week so I will sort out all the stuff and make it home, THEN I will be getting out my creative stuff and making something, so I can scratch this itch!!!
So my next blog will be from Scotland, so until then
Be good, be creative and be happy
Jinny xx

Saturday 18 August 2018

New chapter

Well, it is fair to say I am totally pants and keeping this blog up and going.
Life has started to change drastically for myself and my family. We live in Devon but have just bought a brand new caravan in Scotland and in 12 days time, we, being my husband and myself shall be moving up there to live...BUT we shall still be working in Devon. It all part of our 3-year plan!!
My dream is to give up work and be creative full time and after thinking about this for a very long time, it is finally started to become a realisation of doing it.
My kids have flown the nest, to start living their own lives and I honestly think, that if we had not made this decision, then they would still be living at home till we are 80 years old!!!
So right now I have just finished packing up my craft shed, which was way harder than I thought to do and have had to downsize our home drastically to fit in our new home.
I loved living in this house we have called home for the past 6 and half years but it really is time to say goodbye and start living life. We shall be working one week in Devon as Support workers, a job we so love doing and I also get to help out in the craft part of my job, so double bonus for me. I have done this job for the past 4 years and will be sad to give it up eventually but will cross that bridge when I come to it.
Although this what I am doing, the moving, the new chapter in our lives is something  I want to do, I have found it very emotional doing it, much more than I ever realised, although I will still get to see my youngest two children on a regular basis, I forgot to mention, my eldest Daughter and 2 rather gorgeous Grandsons also live in Scotland, So for me I get to see all three of my children on a regular basis and on my week off, as work will be one week on and one week off, I shall get to carry on being creative and fulling my passion to be creative.
I think I may start using this a diary as it has made me feel a little better about my feelings.
So if you want to follow me on my journey, then you are more than welcome to follow me and I will pinky promise to try and document what is happening and how I feel as and when I can, and if memory serves me lol
Right now, this minute I am waiting for my Daughter from Scotland and Son in law to bring down a van to load up with a bulk of our belongings and more importantly my art stuff. Which means I can't do anything creative for the next two week :(
So adios amigos


Friday 1 June 2018

Long time no post

Well, it is fair to say that I am pants at keeping up and publishing regular posts, so I am going to try at least for now doing a post once a month. I think that is not too higher goal for me.
Working full time as a support worker and Family life takes it's toll on you sometimes and when you do get to have some "YOU" time, there are always other jobs on that job list that seems to be about 5 foot long! And not forgetting I love to create, it is what helps to keep my sanity.

So with all that said this week, I actually made some "Art" time and made a couple of pieces.

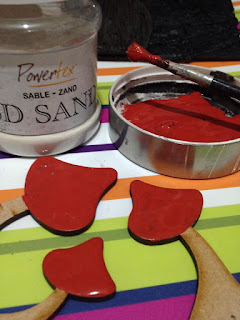
My youngest Daughter also does the same job as me and it's half term and this is always an extra bust time at work and the other night, I said to her, let's just chill and unwind and make some art. To which we did and we upcycled a couple of Poundland paint brushes into fridge magnets.


The top one is mine and the other is my Daughters, didn't she do a good job?
Well, I think she did and yes I am probably a little bit biased :) 

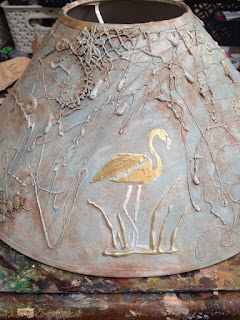
The next project I did was to upcycle a lampshade which has been sat looking sorry for itself for quite a while, sadly I did not remember to take a photo of what it looked like before I added a touch of my artistic flair to it... Old age has started to creep in already!! Lol 
 I used Powertex as my base, my trusty glue gun for some texture and an Alice in Wonderland  stencil from Powertex UK 
You can't see it but the wording on my lampshade took from the stencil say's," we're all mad here" which in my families case, is not far wrong, so I found it quite fitting, to be honest!! 
I have also used some metal embellishments, paint and powertex pigment colour and to finish it all off, have added some trim around the top and bottom.

I hope you have enjoyed reading my ramblings and maybe, just maybe I may even have inspired you to try and make something creative.
Until next month
Enjoy life and love hard
Jinny 

Saturday 3 March 2018

Snow days

Well, I have been off work for the past three days, due to the snow we have all just experienced.


As I only normally get to go in Mum's Shed in my spare time, I thought I would make the most of it.
I ended up finishing off a few projects.


This is a polystyrene egg as a base and I have created the egg look with Powertex and the dragon I have made from Polymer clay. I do love a bit of fantasy and whimsical things and I love dragons.

I have had this little table for a while and it was always on my to-do list, to do something with it.
So I decided to add Powertex to it and see where my creativity took me.

And this is what my muse decided to create


It has taken on a bit of a Gothic-chic look.
Powertex is a very versatile medium and one of my fave mediums to use for all my creative projects.


Powertex Design Team

I have had the honour of being asked to join the POWERTEX UK Design Team.
So here is my second blog I did for them.
I hope you enjoy it. 


First I set about placing, so I had an idea of what I was going to achieve.
I painted the fairy house in black Powertex. 

I then chose some material from my stash and dipped in the BlackPowertex and laid over my roof and then dried it.


I then decided to add some texture to the base of the Fairy house,
using the 3D Sand balls.

I then decided to use the Powertex ,Paperdecoration for my main texture. This is a really lovely texture as once saturated with the Powertex it stretches and makes a really nice texture. 


I next set about making some texture for my Fairy door and I used the same method as above with the 3D sand and Black Powertex, only I added more to make a kind of paste. I then used a palette knife to smooth it on the door and ran a crochet hook in lines to give it a wood effect, let it dry.
I also added some of the lace from the kit, to under the roof, to add extra texture.


In the next three photos, whilst the door was drying I started to decorate three of the toadstools from the kit. Again I used  3D Sand for the texture and this time, some red Powertex.

I did two layers with the red Powertex and 3D sand to add some depth and I painted the stalks with Ivory Powertex.

I then used some Mocha pigment and dragged it through the wet Ivory Powertex, to create lines, making my Toadstools look more lifelike.
I then wanted to incorporate the stencil onto my Fairy house but the Paperdecoration was too textured if you like, so I had to find a way to get the stencil to work. I came up with the idea of laying down some masking tape, to make a smoother surface, to add the stencil. To create the texture to add to the stencil, yep, you guessed it I used the 3D Sand and Black Powertex to form a paste and palette over the stencil. I then dried it with my trusty hairdryer, as I did not want to smudge the text.

I then added my windows and chosen embellishments and painted with black Powertex and dried.
I already had a colour theme and chose these Pigment colours and began to dry brush onto my fairy house. The beauty of this technique is if you don't like it, you can change your mind and re-do it!


And here is the end result.


These are the bits I had left, along with some lace, which I know I will definitely use in another Powertex project.

I really enjoyed making this kit and I hope to see all the Fairy houses you create.
Feel free to share them on the Powertex Addicts page on Facebook.
Laters Powertexers
Jinny

Dragon Time

Good morning one and all. Having all this time to create is brilliant and even better I am remembering to blog about my antics as well. ...